Integrating Jekyll-based Github pages with Notion pages
본 게시글의 한국어 버전은 여기에서 확인하실 수 있습니다.
Introduction
Recently, I discovered an interesting Repository that provides a blog template that automatically imports Notion Pages by linking Notion and Next.js.
However, since the current blog is closer to the design I preferred, I decided to add that feature to the current blog.
Normally, I would write a post in Notion, export it to Markdown, edit it a bit, and then upload it to my blog, but now I just write it in Notion and click the button to automatically upload it to my blog, so it’s very easy.
This was developed by referring to a previously developed blog linking Jekyll and Notion. I fixed some errors and added features in the blog I referenced.
Below is the finished version.
Just by pressing the refresh button, the post is automatically uploaded to the blog.
Now let’s know how to implement it.
Notion configuration
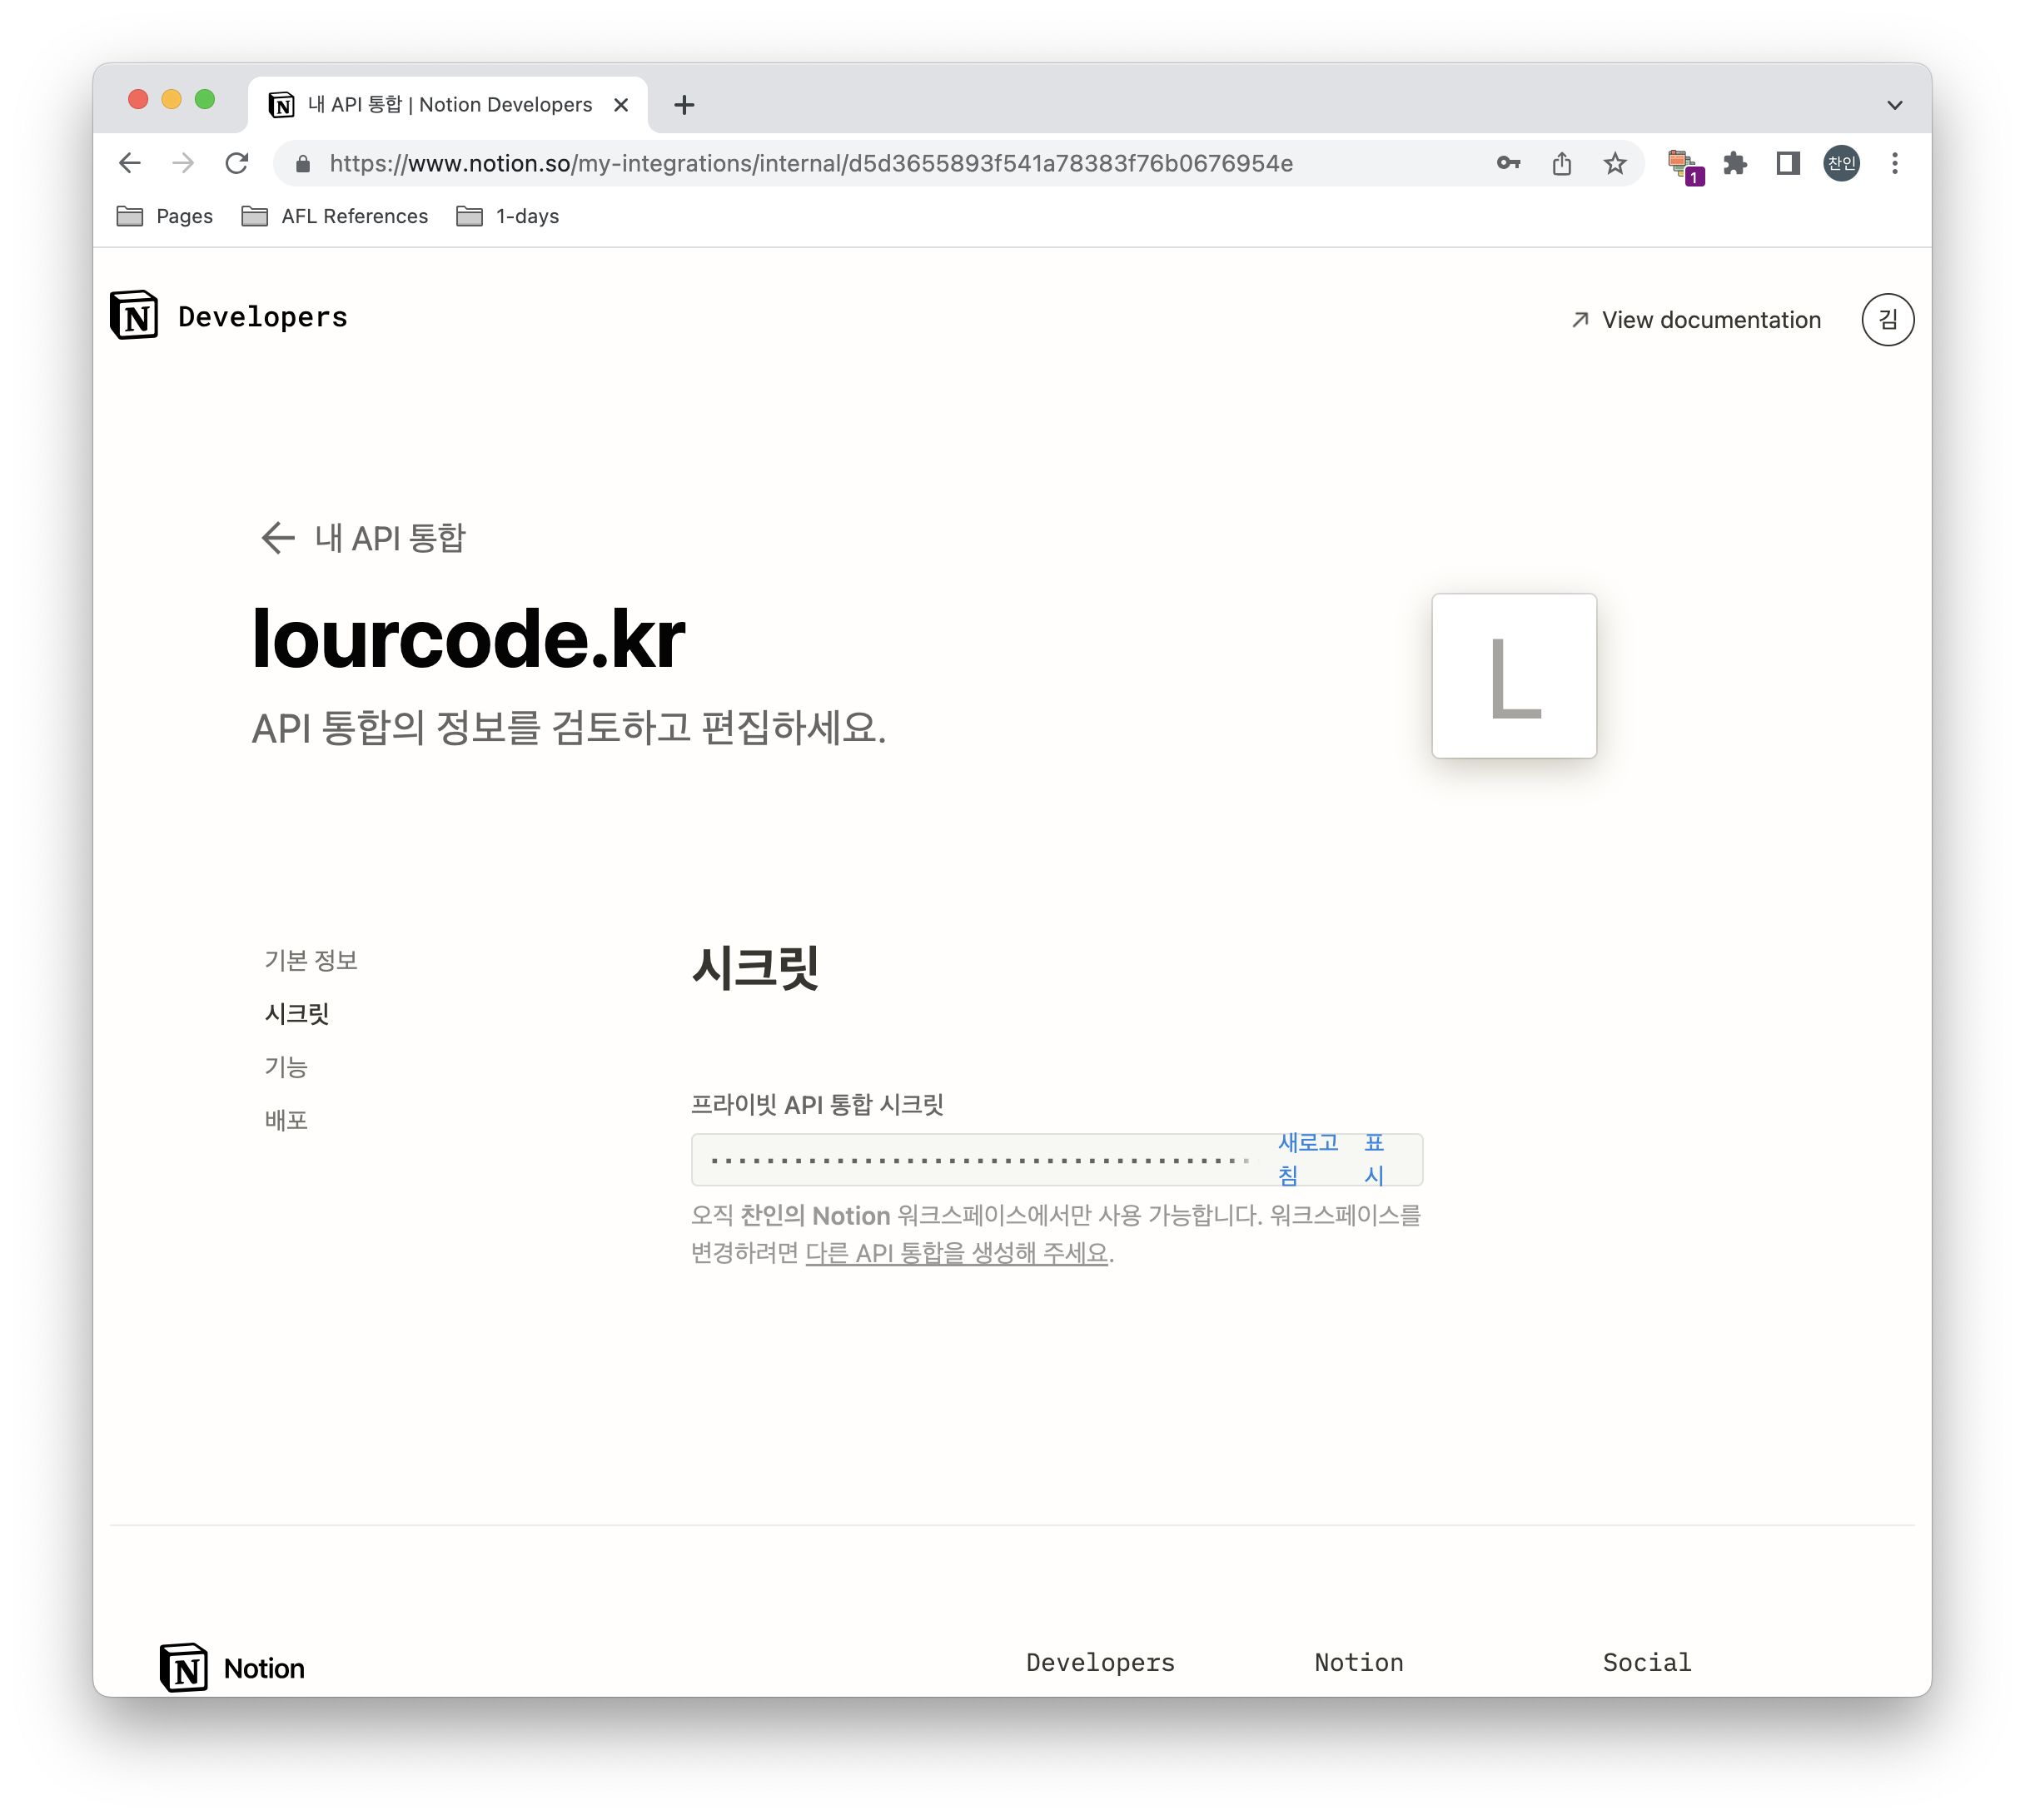
First, we need to create an API integration in Notion.
After creating a new API integration from the link below, keep the Secret value safe.
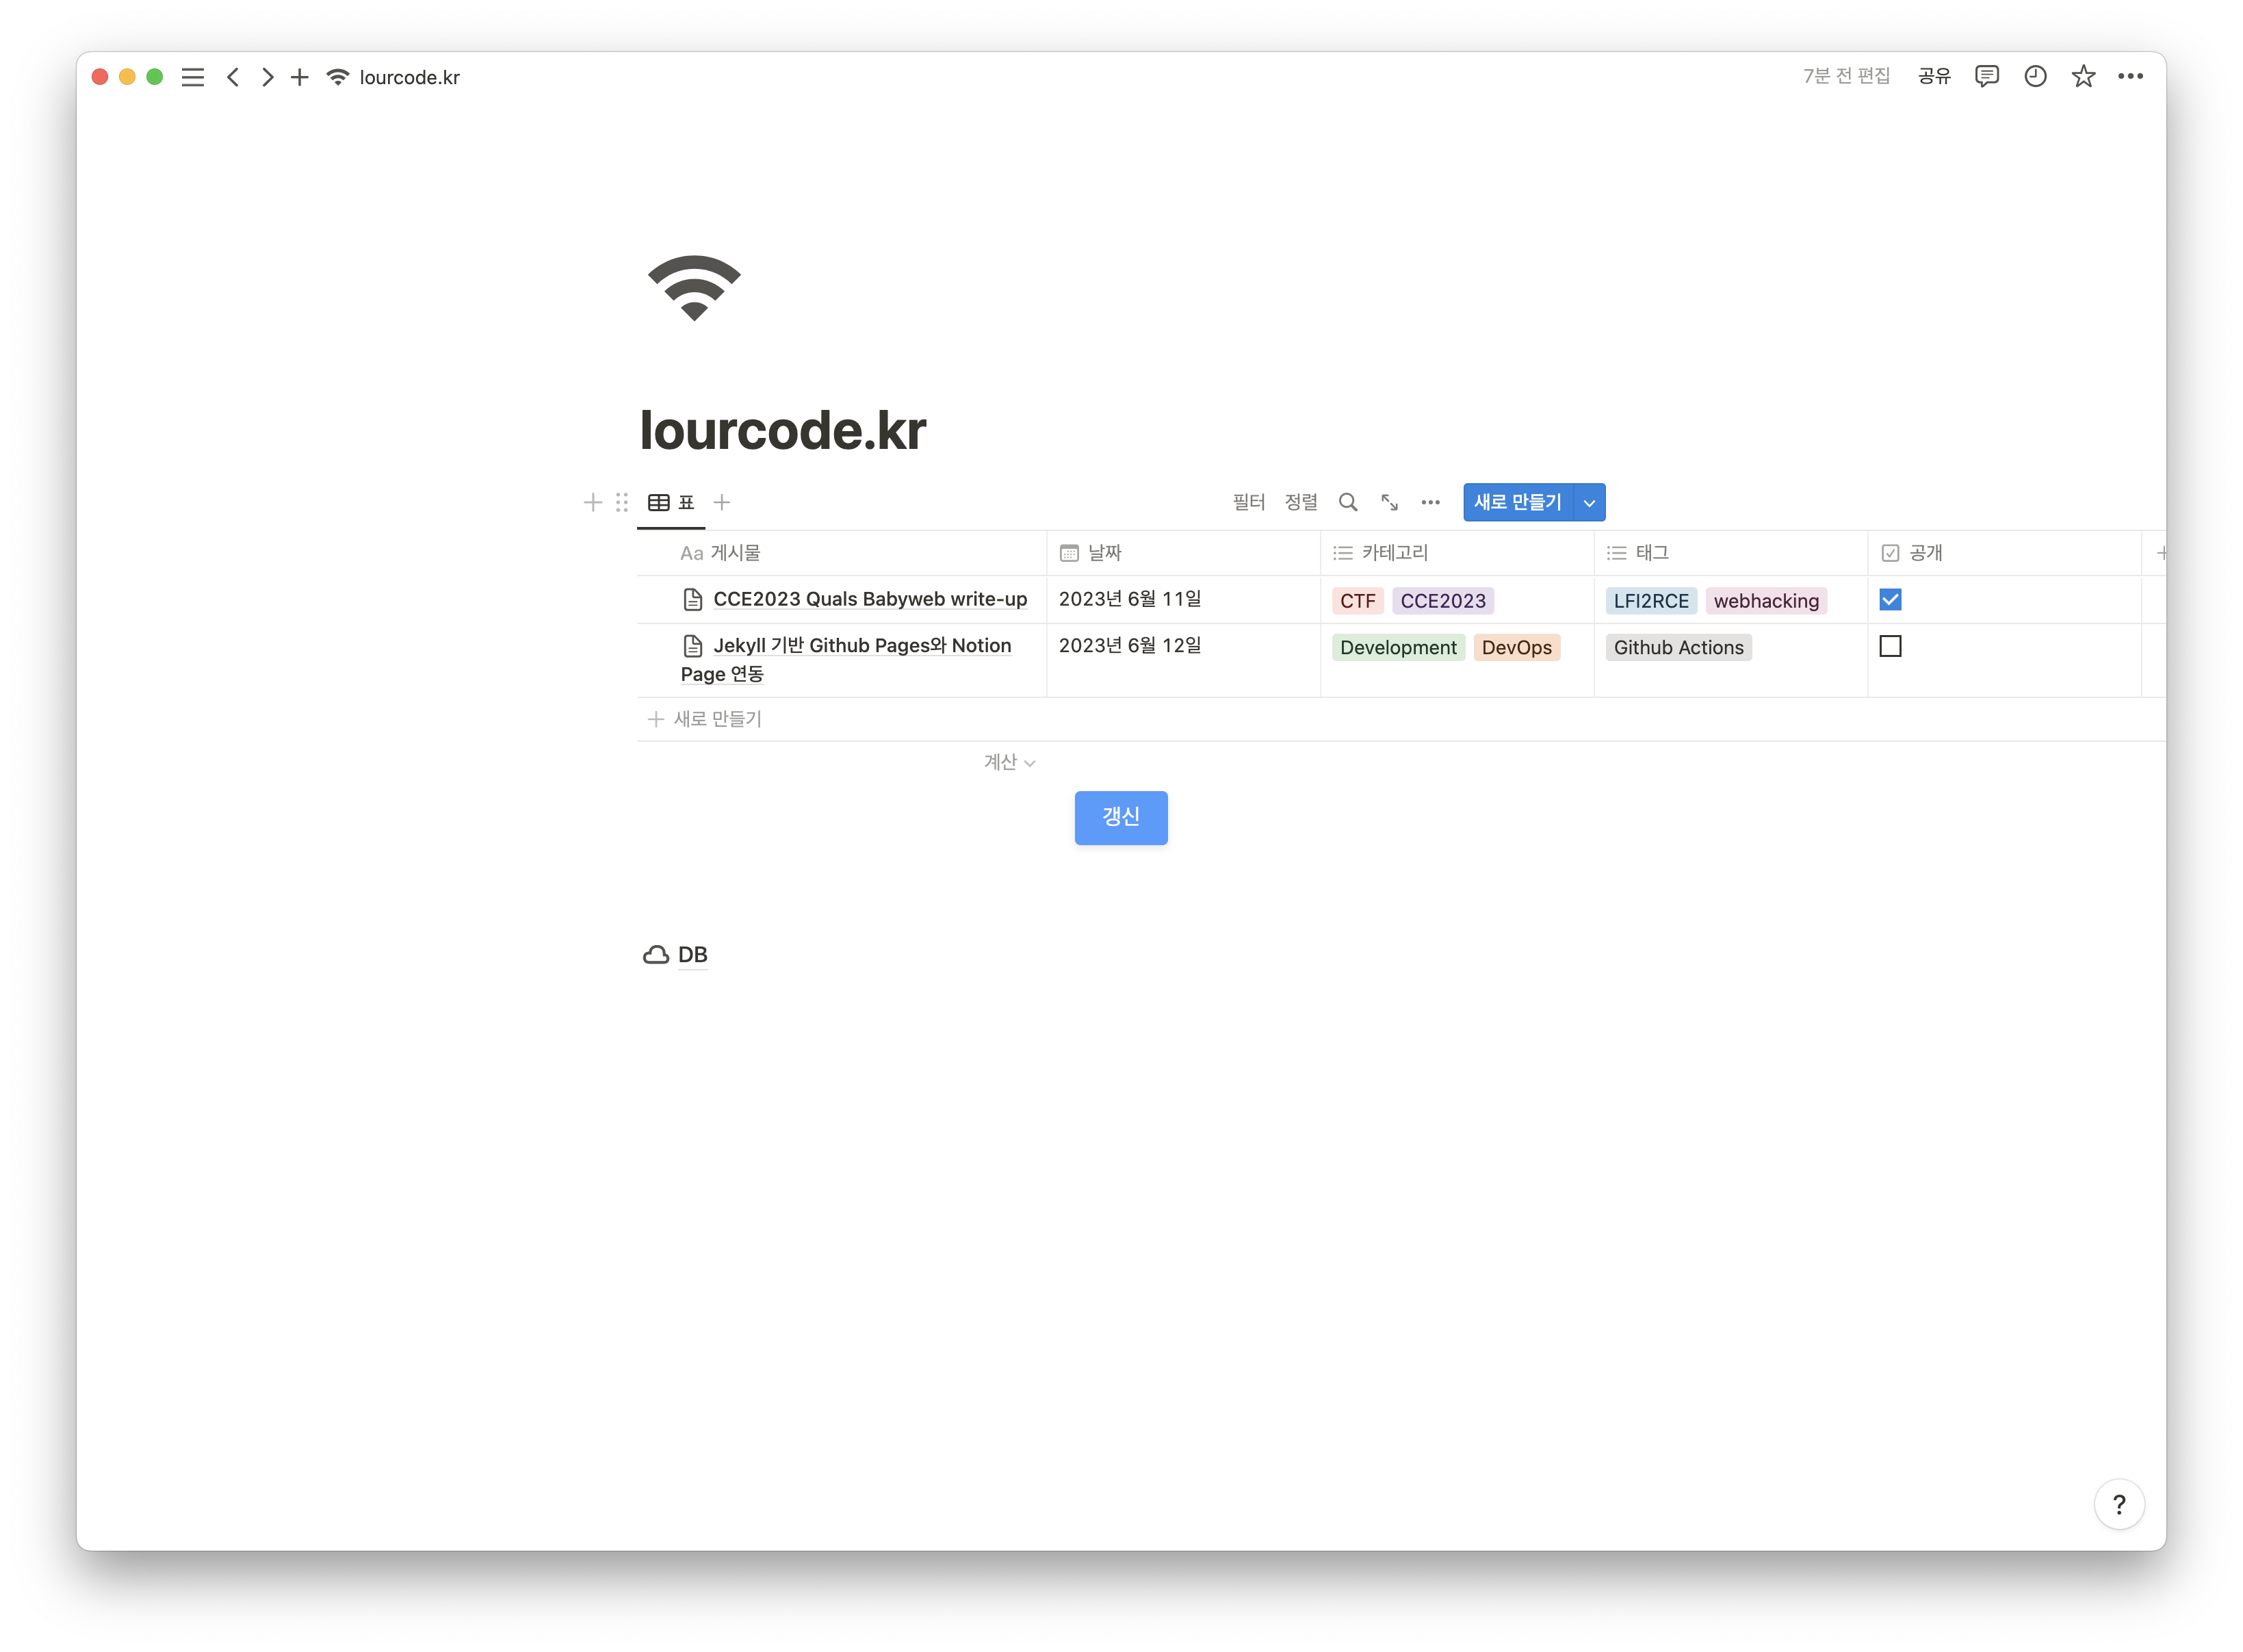
Next, create a page to write a blog post. You can use the template below.
Add the API integration to the page created above as follows:

Now we need to know the ID for the database. You can get the database ID by copying the page link.
After you go to the DB page and click Copy Link, you can get a link that looks like the one below.
https://www.notion.so/<database_id>?v=<long_hash>
Save the database_id above.
Now all we have to do in Notion is done.
Github Configuration
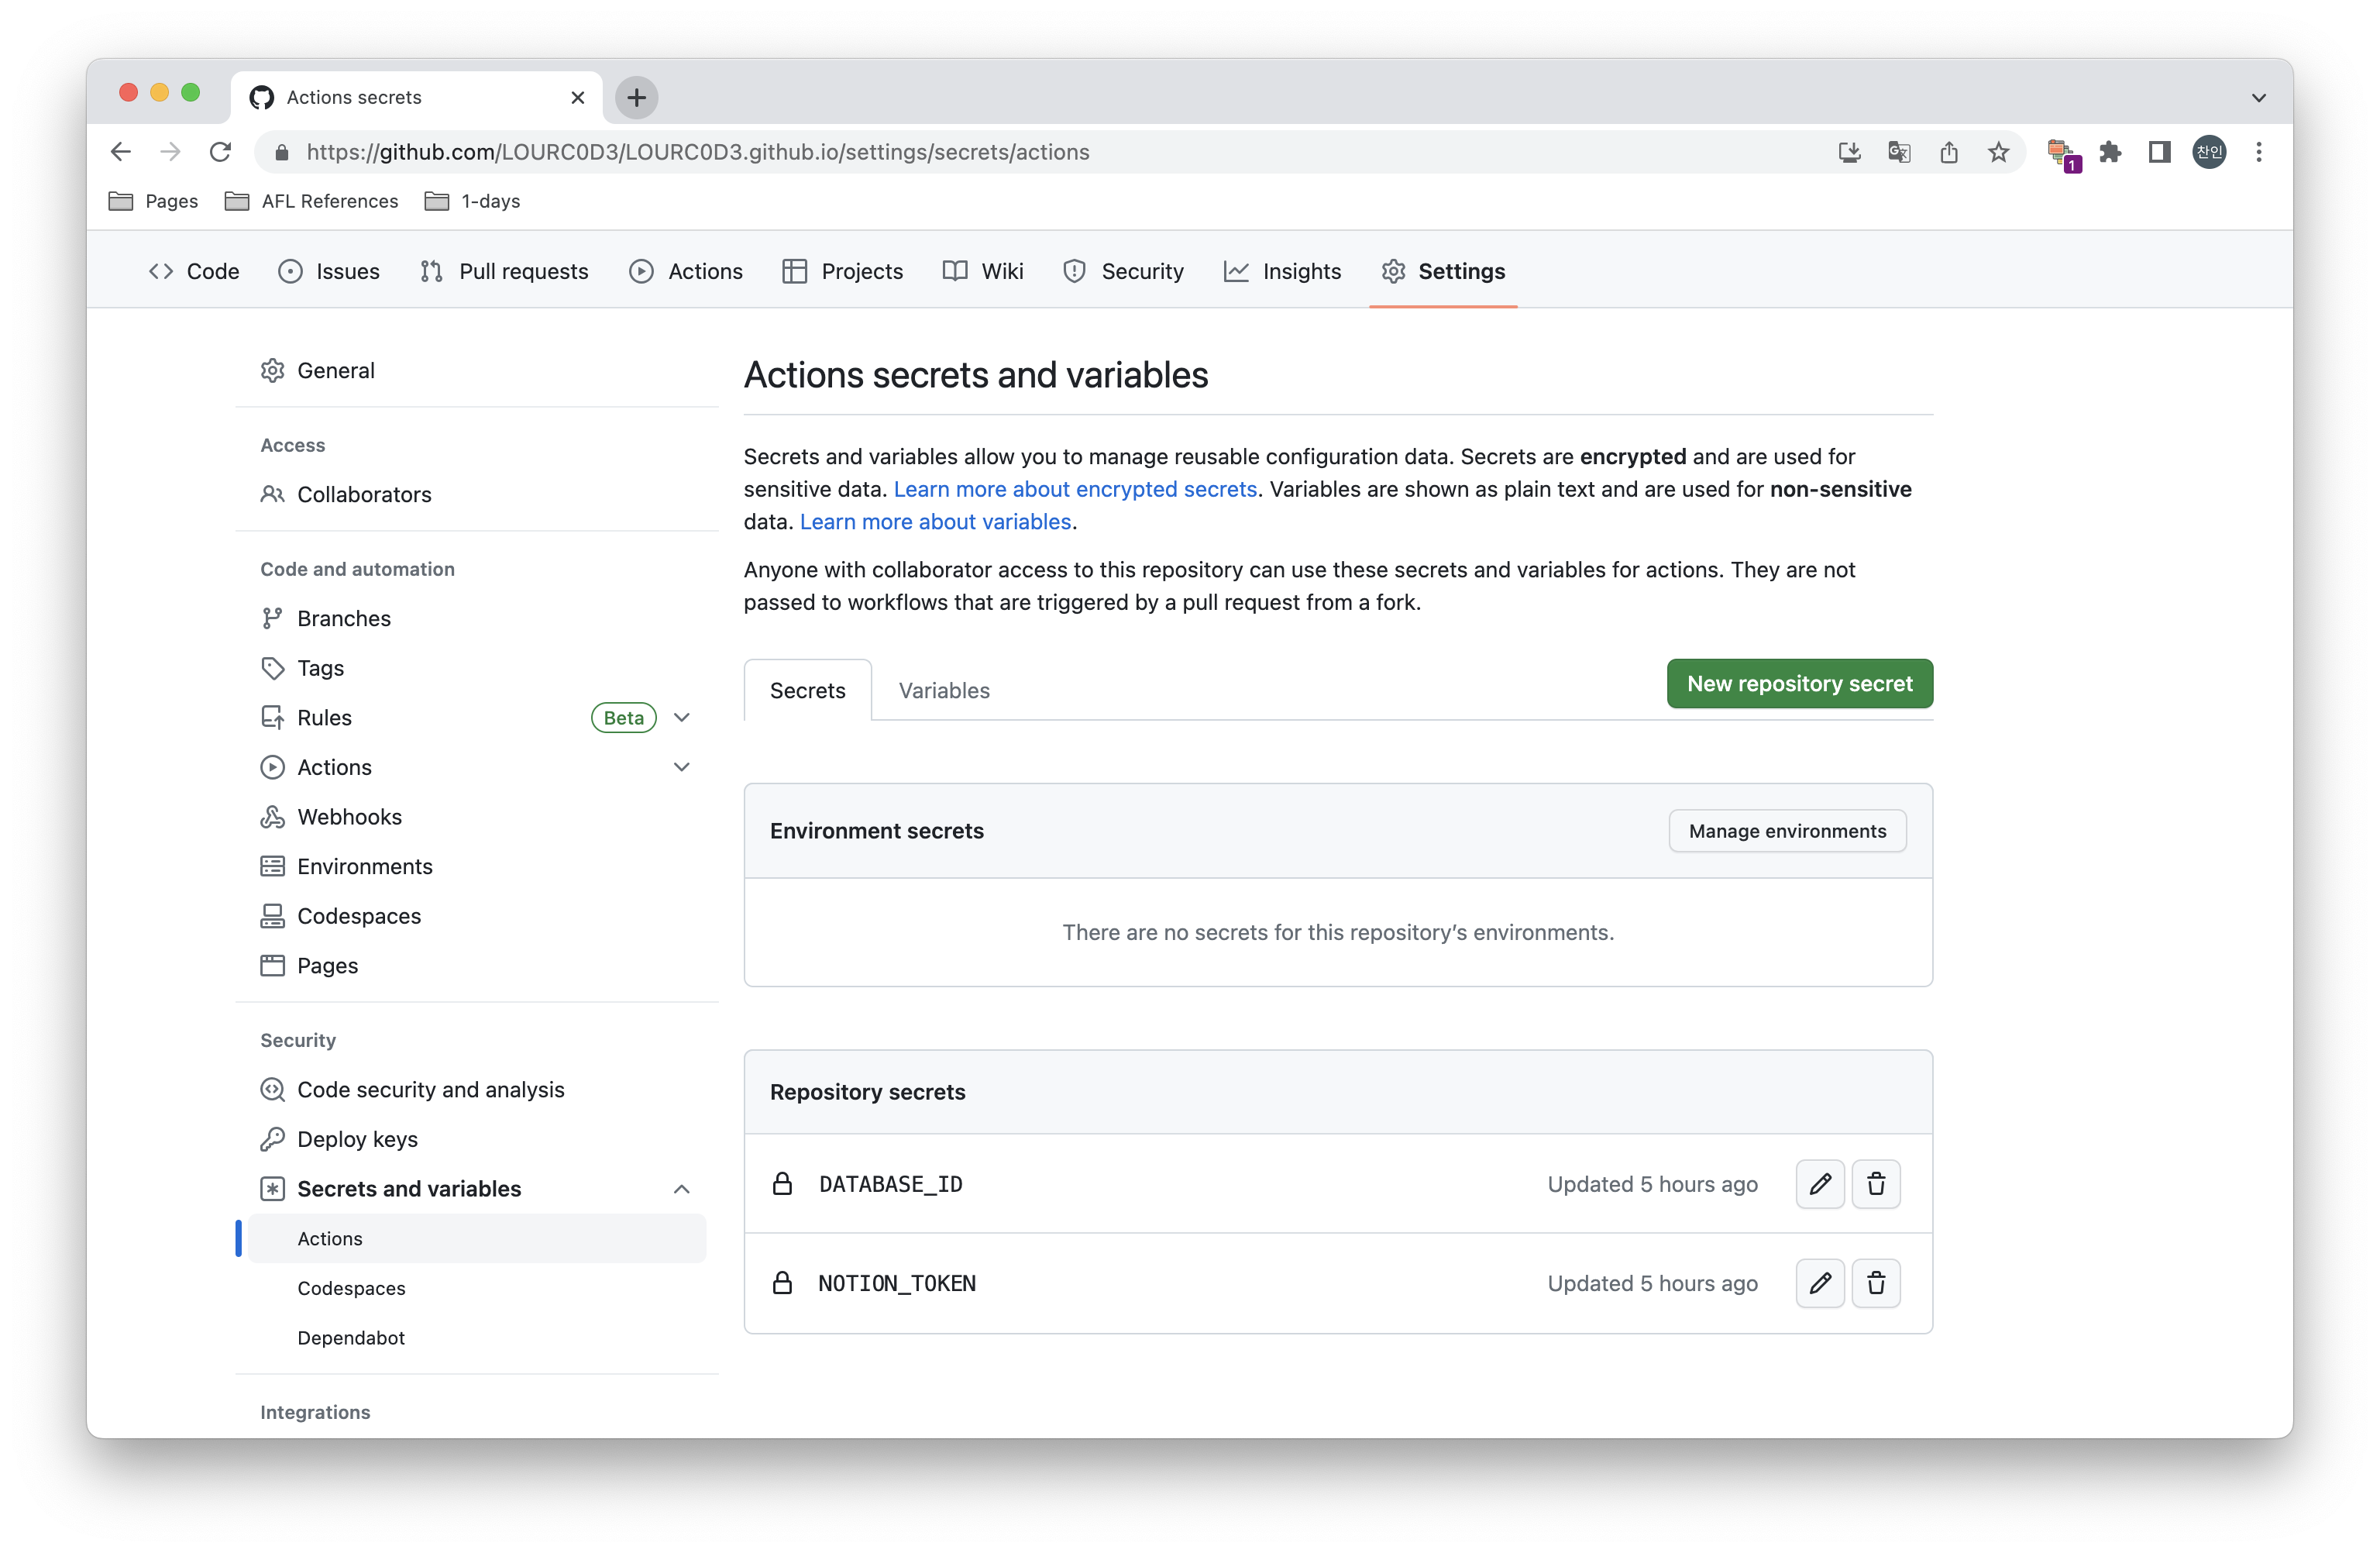
First, we need to register an environment variable in Github Secret. Just register the tokens you copied previously.
Key name is set as follows:
Next, a total of two scripts are needed to read the workflow file and Notion page contents.
First, it is a import script.
_scripts/notion-import.js
Specifies dependencies for the above Javascript file.
Write it in the package.json location.
1
2
3
4
5
6
7
8
9
10
{
    "devDependencies": {
        "@notionhq/client": "^1.0.4",
        "@types/node-fetch": "^2.6.2",
        "moment": "^2.29.2",
        "node-fetch": "^2.6.7",
        "notion-to-md": "^2.5.5",
        "axios": "^1.4.0"
    }
}
Next is the workflow.
Deployment scripts are different for each template, so minor modifications may be required.
.github/workflows/pages-deploy.yml
1
2
3
4
5
6
7
8
9
10
11
12
13
14
15
16
17
18
19
20
21
22
23
24
25
26
27
28
29
30
31
32
33
34
35
36
37
38
39
40
41
42
43
44
45
46
47
48
49
50
51
52
53
54
55
56
57
58
59
60
61
62
63
64
65
66
67
68
69
70
71
72
73
74
75
76
77
78
79
80
81
82
83
84
85
86
87
88
89
90
91
92
93
94
95
96
97
98
99
100
101
102
name: "Build and Deploy"
on:
  repository_dispatch:
    types: [RUN_WORKFLOW_DISPATCH]

permissions:
  contents: write
  pages: write
  id-token: write

# Allow one concurrent deployment
concurrency:
  group: "pages"
  cancel-in-progress: true

jobs:
  importer:
    runs-on: ubuntu-latest

    steps:
      - uses: actions/checkout@master

      - name: Clean Directory
        run: |
          for file in assets/img/*
          do
              if [[ $file != "assets/img/favicons" ]]
              then
                  rm -rf "$file"
              fi
          done
          rm -rf _posts/*

      - uses: actions/setup-node@v3
        with:
          node-version: "17"

      - run: npm install

      - run: node _scripts/notion-import.js
        env:
          NOTION_TOKEN: ${{ secrets.NOTION_TOKEN }}
          DATABASE_ID: ${{ secrets.DATABASE_ID }}

      - uses: stefanzweifel/git-auto-commit-action@v4
        env:
          GITHUB_TOKEN: ${{ secrets.GITHUB_TOKEN }}
        with:
          commit_message: "[Deploy] Save changes in Notion"
          branch: main
          commit_user_name: importer-bot 🤖
          commit_user_email: [email protected]
          commit_author: importer-bot 🤖 <[email protected]>

  build:
    needs: importer
    runs-on: ubuntu-latest

    steps:
      - name: Checkout
        uses: actions/checkout@v3
        with:
          ref: main
          fetch-depth: 1
          # submodules: true
          # If using the 'assets' git submodule from Chirpy Starter, uncomment above
          # (See: https://github.com/cotes2020/chirpy-starter/tree/main/assets)

      - name: Setup Pages
        id: pages
        uses: actions/configure-pages@v1

      - name: Setup Ruby
        uses: ruby/setup-ruby@v1
        with:
          ruby-version: '3.1' # reads from a '.ruby-version' or '.tools-version' file if 'ruby-version' is omitted
          bundler-cache: true

      - name: Build site
        run: bundle exec jekyll b -d "_site${{ steps.pages.outputs.base_path }}"
        env:
          JEKYLL_ENV: "production"

      - name: Test site
        run: |
          bundle exec htmlproofer _site --disable-external --check-html --allow_hash_href

      - name: Upload site artifact
        uses: actions/upload-pages-artifact@v1
        with:
          path: "_site${{ steps.pages.outputs.base_path }}"

  deploy:
    environment:
      name: github-pages
      url: ${{ steps.deployment.outputs.page_url }}
    runs-on: ubuntu-latest
    needs: build
    steps:
      - name: Deploy to GitHub Pages
        id: deployment
        uses: actions/deploy-pages@v1
Refresh Button
Using Github’s dispatch, you can update posts by pressing a button.
First, you need to create a Github AccessToken.
Create a new token in Settings → Developer settings → Personal access tokens.
For scope, select repo, workflow, or admin:repo_hook.
Store this token safely.
Notion can embed HTML, so we can send POST messages through HTML.
I implemented a way to execute dispatch using this method.
If you use the link below, you can pass the HTML code using the GET method, so there is no need to worry about token leakage.
Just create the HTML code from the link below and add it to Notion using the generated link.
You can also check the code for the page below, so you can use it with confidence.
Change USERNAME, REPO_NAME, and GITHUB_ACCESS_TOKEN in the code as follows and then generate the link.
For ACCESS_TOKEN, simply write the token created above.
1
2
3
4
5
6
7
8
9
10
11
12
13
14
15
16
17
18
19
20
21
22
23
24
25
26
27
28
29
30
31
32
33
34
35
36
37
38
39
40
41
42
43
44
45
46
47
48
49
50
51
52
53
54
55
56
57
58
59
60
61
62
63
64
65
66
67
68
69
70
<!DOCTYPE html>
<html>
<head>
  <meta charset="UTF-8">
  <style>
    .trigger-container {
      display: flex;
      flex-direction: column;
      align-items: center;
      text-align: center;
    }

    .trigger-button {
      display: inline-block;
      margin-bottom: 10px;
      padding: 10px 20px;
      background-color: #4c9aff;
      color: white;
      font-size: 16px;
      border: none;
      cursor: pointer;
      border-radius: 4px;
      box-shadow: 0px 2px 6px rgba(0, 0, 0, 0.1);
      transition: background-color 0.3s;
    }

    .trigger-button:hover {
      background-color: #2e86ff;
    }

    .message {
      font-size: 16px;
      color: #333;
    }
  </style>
</head>
<body>
  <div class="trigger-container">
    <button id="triggerButton" class="trigger-button">갱신</button>
    <div id="message" class="message"></div>
  </div>

  <script>
  document.getElementById("triggerButton").addEventListener("click", function() {
    var messageElement = document.getElementById("message");
    messageElement.textContent = "Send request..";

    var xhr = new XMLHttpRequest();
    xhr.open("POST", "https://api.github.com/repos/USERNAME/REPO_NAME/dispatches", true); <!-- EDIT HERE -->
    xhr.setRequestHeader("Accept", "application/vnd.github.v3+json");
    xhr.setRequestHeader("Authorization", "Bearer GITHUB_ACCESS_TOKEN"); <!-- EDIT HERE -->
    xhr.setRequestHeader("Content-Type", "application/json");

    xhr.onload = function() {
      if (xhr.status === 204) {
        messageElement.textContent = "Request has been sent successfully." + xhr.status;
      } else {
        messageElement.textContent = "Failed to send request.<br>Status code:" + xhr.status;
      }
    };

    xhr.onerror = function() {
      messageElement.textContent = "An unknown error occurred while sending the request.";
    };

    xhr.send(JSON.stringify({"event_type": "RUN_WORKFLOW_DISPATCH"}));
  });
</script>
</body>
</html>
Now connect the link through embed on the Notion page.
If you have followed along successfully, you can check that the blog is updated through the button once completed!

Why not use cron scheduler
Previously, I used the update button and cron scheduler to update posts, but one day, an email like this arrived.
We know when a post will be updated. Therefore, it was determined that the cron scheduler was not needed and the function was deprecated.
Conclusion
I integrated Notion and Github pages using Github Actions.
Actions are always very confusing, so I end up digging through them for a long time.
All codes related to building the blog are posted here.
Alternatively, you can use the repository template with initial settings completed through this link.
References
- https://aymanbagabas.com/blog/2022/03/29/import-notion-pages-to-jekyll.html
Update Timeline
- N/A